

Navigation
To access the Course Creation interface:
1. Using the Toggle Menu Bar:
- From the landing page or home page, click the toggle menu bar (double-chevron-right icons).
- Navigate to Learning → Course to open the Course Listing Page.
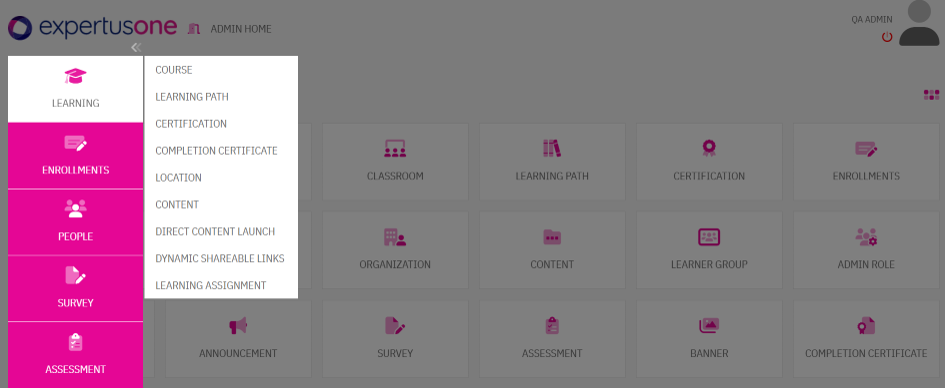
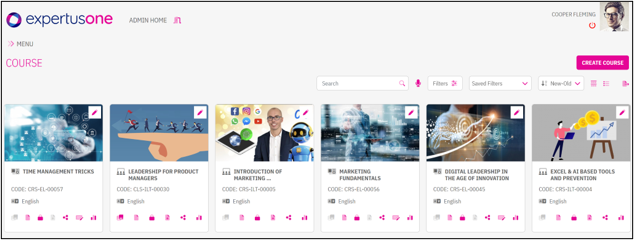
- Click the Create Course button in the top-right corner to access the Create Course Page.
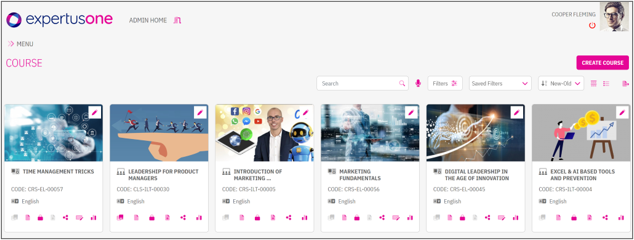
2. Using Quick Access:
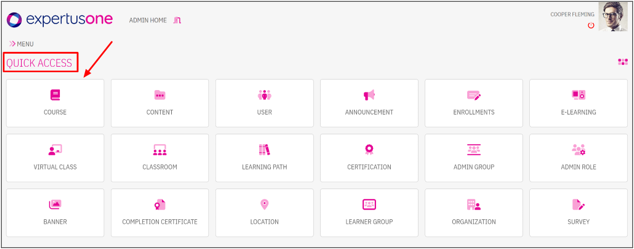
- On the landing/home page, locate the Quick Access menu.
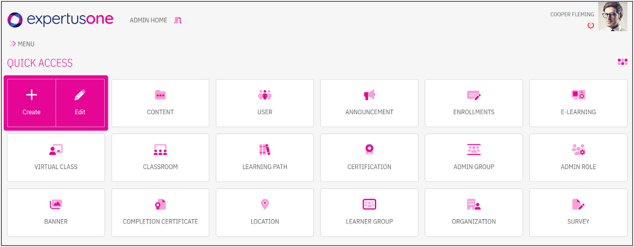
- Hover over Course to display two options:
- Create: Opens the Create Course Page.
- Edit: Opens the Course Listing Page on the Published tab.
- The system also provides quick options to directly create an E-learning, ILT, or VC class.
-
- Select ‘Create’ to create a new course or ‘Edit’ to access the list of existing courses
Course Creation Page
The Create Course Page allows administrators to define course metadata, delivery settings, and content for single- or multiple-instance courses.
- Define essential details like title and delivery type, with optional settings for customization.
- Enabled via site-level Code Conventions for unique identifiers.
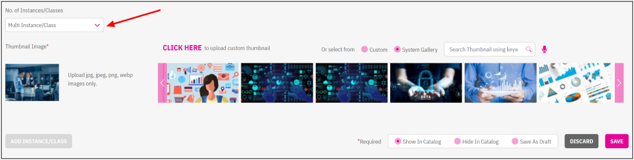
- Toggle between single and multiple instance modes using the No. of Instances/Classes dropdown.
- Control whether the course appears in the catalog.
- Support saving, discarding, or publishing courses.
How to Create a Single Instance Course
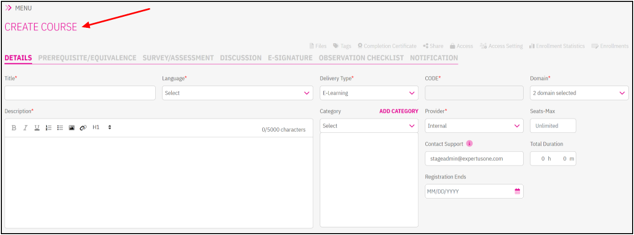
1. Navigate to the Create Course Page:
- Use Learning → Course → Create Course or Quick Access → Course → Create.
Note: ExpertusONE recommends the use of the Auto-Generated Coding Feature for all objects in the LMS. Admins can enable this feature in Admin Site Configurations > Code Conventions icon > Enable and edit to set the default code convention for all the objects. Once this is enabled, the system will automatically generate a unique code for every newly created object in the LMS.
2. Complete Mandatory Fields:
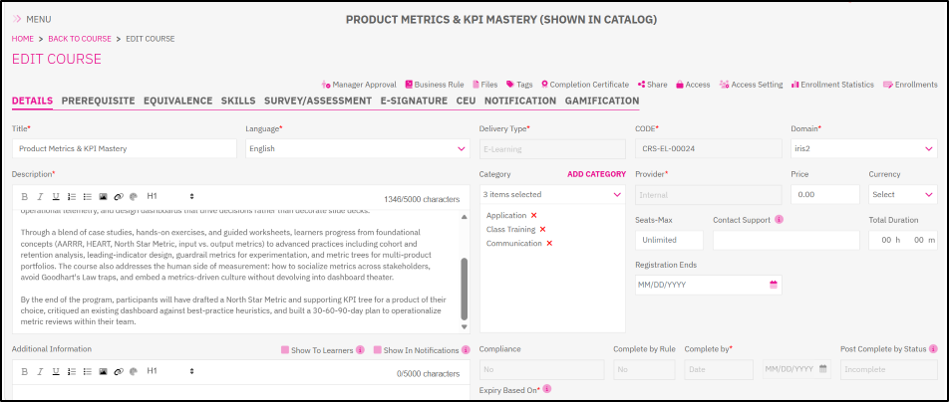
- Title: Enter a clear, descriptive title that accurately reflects the content and purpose of the course.
- Language: The default LMS language will be set automatically; admins can change the language if required.
- Delivery Type: Specifies how the course content is delivered to learners. Choose Web-Based Training (WBT) for a single instance.
- Code: Unique identifier for the course, used internally. The system auto-generates a code by default when the option is enabled.
- Description: Provide a course overview that summarizes the course.
- Thumbnail Image: Upload an image that visually represents the course.
- Provider: Specify the training provider responsible for developing or supplying the course content. The drop-down value for this field is created from Provider under the learning module in the metadata library.
- Complete by Rule: Defines the deadline by which a learner must complete the training. Administrators can configure completion requirements based on a specific date or a relative timeframe, ensuring learners complete the course within the required period.
- Expiry Based on: Defines the rule that determines when a learner’s completion of the course expires.
3. Configure Optional Fields:
- Add Category, Price, Currency, Seats Max, Total Duration, Wait List, Registration Ends, Additional Information, or Compliance as needed.
- Category – Explained in detail in the Adding Category section.
- Contact Support – By default, the email ID of the admin who is creating the course will be visible.
- Additional Information – If the admin wants to provide any additional information, the admin can do it up to 500 characters.
- Custom Fields — If custom fields have been configured for the course entity in the Metadata Library, they will appear in this section for completion.
- Associated Groups — This section is accessible from the Edit course after the course has been created. It displays the learner groups and admin groups the course is associated with.
4. Add Content:
- Use the Add Content section to include E-Learning materials (e.g., videos, documents).
5. Choose an Action:
- Discard: Cancels changes and redirects to the Course Listing Page.
- Save as Draft: Saves the course in Draft mode, allowing administrators to return to it later for further edits before publishing it for learners.
- Show in Catalog: Makes the course visible in the learner catalog upon publishing.
- Hide in Catalog: Hides the course from the catalog. But the admin can still make the enrollment.
6. Upon saving, the admin is redirected to the Success Status Page with the message: “Course ‘[Title of the Course]’ has been published successfully” or “saved successfully” and a success icon.
How to Create a Multiple Instance Course
For creating courses that are delivered through Classroom or Virtual Class (VC) or E-Learning that is offered in multiple languages, multiple formats (video/audio/docs, and so on), and multiple classes with different slots (based on date/time or location), the admins need to switch to a multi-instance course by using the dropdown field “No. of Instances/Classes”. When the admin switches to “Multi Instance/Class,” the course creation page will start behaving as a container that will capture all the common information and settings of all the instances/classes that it needs to hold.
Note: Learners will have to complete any one of the multi instances/classes in order to complete the course.
1. Navigation – Please refer.
2. Course Creation Page – Please refer.
3. In the course details page, for the field ‘No. of Instance/Classes, ’ change from the default Single Instance to Multiple Instance/Class.
4. When the admin switches to “Multi Instance/Class,” the course creation page will start behaving as a container that will capture all the common information and settings of all the instances/classes that it needs to hold.
5. An Add Instance/Class button will appear at the bottom of the details tab that will be enabled as soon as the course is saved.
6. Clicking on “Save,” you will be directed to the Success Status Page.
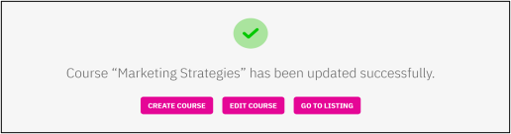
7. Admins will have to click on the “EDIT COURSE” button from the success page to continue editing the course and to create instances/classes.
8. In the Edit Course page, ‘Add Instance/Class of this Course’ is enabled to attach instances to the course.
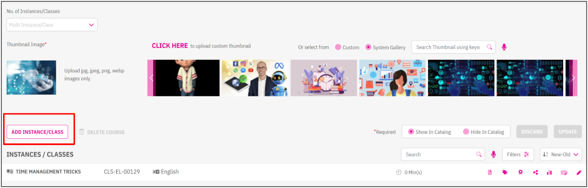
Add Instance/class
When an E-Learning course is offered in multiple languages and/or multiple formats (video/audio/docs, and so on), the different flavors are referred to as instances of the course.
When a course that is delivered through the classroom or virtually is offered in one or more languages or slots (different date-time or location or instructor), then we refer to each of the flavors as a class.
Key fields relevant to multiple instance courses:
- No. of Instances/Classes (Optional): Dropdown to select Single Instance (default, E-Learning only) or Multi Instance/Class.
- Selecting Multi Instance/Class transforms the course into a container for multiple instances/classes.
- Delivery Type (Mandatory): Select from Web-Based Training (WBT), Classroom, or Virtual Class for each instance/class.
- Other fields (e.g., Title, Language, Code, Description, Thumbnail Image, Provider, Complete by Rule, Expiry Based on) are inherited by instances/classes from the course.
Create Instance / Class
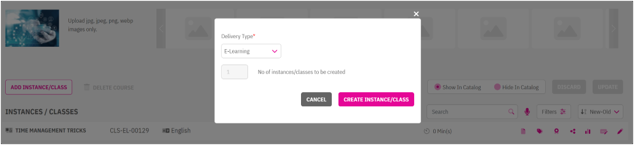
1. Clicking on the “Add Instance/class” will open a light box with the below attributes:
- Delivery Type (E-Learning/Classroom/Virtual)
- No of Instances/Classes
Note: For the Classroom type, you can create one or more classes at a time through the clone functionality. For E-learning and Virtual Class types, you can create only one instance/class at a time.
2. If you have chosen the delivery type as E-Learning or Virtual Class, the field labeled ‘Number of Instances/Classes’ will be grayed out to indicate its non-editable field with a fixed value of 1.
3. If you have chosen the delivery type as Classroom, the field ‘No of Instance/Classes’ will be an open text box for the admin to provide the desired value.
4. For Multiple Classroom, admins will be shown more options to choose the fields that need to be inherited from the course into the classes. By default, all the fields will be selected; admins need to deselect the fields.
5. When you input a value greater than 1 in the “Number of Instances/Classes” field, the administrator can exclusively generate multiple single-session classes for the course. A maximum of 25 classes can be created at once. The following attributes will be presented for selection:
- Assessment
- Category
- CEU
- Files
- Survey
- Tags
- Completion Certificate
- E-Signature
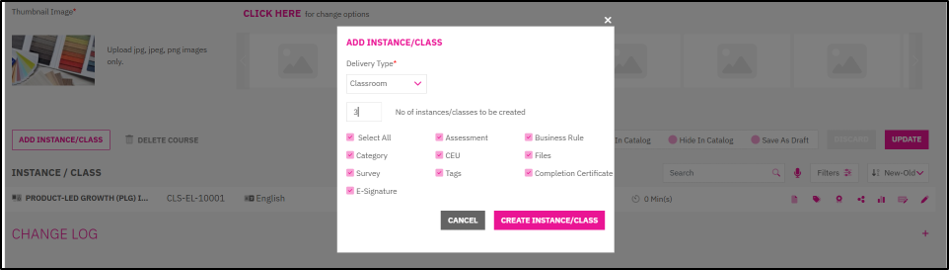
6. Clicking on the button “CREATE INSTANCE/CLASS” will create the desired instance/classes within the course. Admins will be redirected to the edit class page, where they will see all the basic information inherited from the course, and they can provide the content or session details of the class.
Multi Class Creation (Instructor Led Training)
The Multi-Class Creation feature enables administrators to efficiently create multiple classes for a classroom course within a single workflow. Designed to enhance flexibility and streamline class management, this feature allows admins to assign unique class codes (manually or automatically), set catalog visibility for each class, check for scheduling conflicts, and export class data in various formats (CSV, Excel).
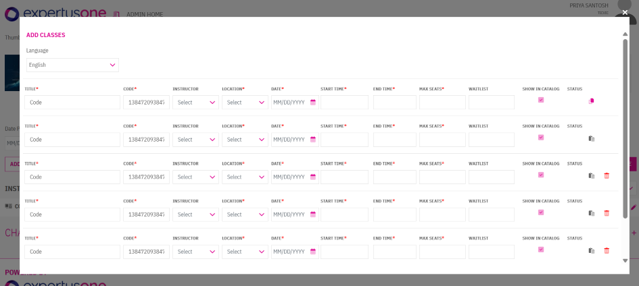
1. After configuring options and proceeding, the “Add Classes” modal opens with the heading “Add Classes” at the top.
2. Use the Language dropdown to select a language (e.g., English, Spanish).
3. The selected language applies to all classes created in this modal.
4. The modal displays the exact number of class rows based on the number of instances selected earlier.
5. Each row represents a separate class instance generated based on the number of instances specified earlier.
6. Each row contains the following fields:
- Title (Mandatory): Auto-populated with the course name but editable.
- Code (Mandatory):
- When the Code Convention setting is OFF, the system automatically pre-populates the class code using the parent course code followed by a hyphen (-) and a unique sequential number based on the number of existing classes associated with the course.
- Example: If the course code is CR-FSD-001, the generated class code may be CR-FSD-001-01.
- The generated class code remains editable, allowing users to modify it if required.
- The system validates the entered code and prevents duplicate class codes using the existing conflict detection logic.
- When the Code Convention setting is ON, the class code is generated according to the configured code convention and cannot be edited.
- Instructor (Optional): Select or enter an instructor.
- Select Location (Mandatory): Choose a location.
- Date (Mandatory): Select a date.
- Start Time (Mandatory): Set the start time.
- End Time (Mandatory): Set the end time.
- Max Seats (Mandatory): Specify the maximum number of seats. The max seats cannot exceed the selected location’s seat capacity.
- Waitlist (Optional): Enable or disable waitlist.
- Show in Catalog (Checkbox):
- If the course is marked “Show in Catalog”, this checkbox is preselected but can be unchecked.
- If the course is “Hide in Catalog” or “Save as Draft”, the checkbox is disabled.
7. Use the copy and paste features to duplicate field values across rows, as available in the modal.
8. The “Check Conflict” button remains disabled until all mandatory fields in all class rows are filled.
9. Click “Check Conflict” to validate each row for schedule conflicts based on:
- Instructor
- Location
- Date
- Start Time
- End Time
10. The system checks conflicts against:
- Other rows in the current modal.
- Existing sessions saved in the backend.
11. If a conflict is detected:
- A red cross icon appears in the status column of the affected row (only the most recently added row for internal conflicts).
- Conflicting fields (e.g., Instructor, Location) are highlighted in red.
12. If no conflict is detected, a green check mark appears in the status column.
13. Even with conflicts (red cross icons), the “Save” button remains enabled, allowing you to save all rows, including conflicted ones.
14. After filling in all mandatory fields and optionally checking conflicts, click the “Save” button.
15. After successful save, a success message appears at the top center of the modal.
16. The user can now view the created classes along with the filled details.
17. An Export icon is visible in the top-right corner of the modal.
18. Click the icon to open a dropdown with options:
- Export as CSV
- Export as Excel
19. Select a format to download the class list, including only the visible data with column headers and formatted content.
Auto-Generated Coding Feature
- Ensures unique identifiers for all LMS objects, including courses.
- Navigate to Tenant Configurations → Code Conventions.
- Click the Code Conventions icon.
- Enable and edit settings to set default code conventions.
- When enabled, the system auto-generates a unique Code for each course (e.g., “CRS-001”), which is non-editable based on the pattern set at Admin Site Configurations → Code Conventions.
- ExpertusONE recommends enabling this feature for consistency.
Category
The Category feature organizes courses into logical groups, with options to select existing categories or create new ones in the metadata library.
1. Access the Category Field:
- On the Create Learning Path/Certification Page or Edit Page, locate the Category field in the Details tab.
2. Select or Create Category:
- Choose an existing category from the dropdown (e.g., “Professional Development”).
- To create a new category:
- Click Add Category.
- Enter the category name in the input field.
- Click the Checkmark/tickmark to save the category to the Learning Module → Metadata Library → Category.
- Use the search box to locate specific categories by typing at least 3 letters.
3. Save Changes:
- Click Save or Publish to apply. Redirect to the Success Status Page.
Course Expiry Feature
This feature allows administrators to define expiration parameters for courses. ensuring compliance and training relevance. The expiry feature sets a validity period for training, supporting compliance needs (e.g., annual recertification). Admins configure expiry based on specific dates, completion dates, or anniversaries, with rules enforced system-wide.
To configure the expiry for a course, navigate to “Admin Home” and select a course.
Enable Compliance Expiry:
- In the compliance section, check “Yes” to enable expiry.
- A tooltip message appears: “If the compliance course is marked as ‘Yes,’ the expiry field becomes mandatory and must be filled out.”
Set Expiry Rules:
- Specific Date Expiry:
- From the “Expiry based on” dropdown, select “Specific Date.”
- Choose a future date (e.g., December 31, 2026) in the date field.
- Set “Register By” and “Complete By” dates for process completion.
- Note: Post-enrollment, this date is non-editable, and the course/certification becomes “hidden in catalog” upon expiry.
- On the expiry date, the certification status changes to Expired.
- Completion Date Expiry:
- Select “Completion Date” from the “Expiry based on” dropdown.
- Enter a number (e.g., “6”) in the “After (No.)” text box and choose a unit (e.g., “Months”) from the dropdown.
- The system calculates the expiry (e.g., July 1, 2024, for a January 1, 2024 completion).
- Once the calculated expiry date is reached, the certification status changes to Expired.
- Anniversary Date Expiry:
- Choose “Anniversary Date” from “Expiry based on.”
- Select “Anniversary Type” (e.g., “Birth Date,” “Hire Date,” “Enrollment,” “Completion”).
- Select “Anniversary Range”:
- Fixed Date: Enter years in “After (Years)” (e.g., 2 years from January 1, 2024, expires January 1, 2026).
- Period Range: Choose a period (e.g., “years”) and enter years in “After (Years)” (e.g., 2 years from January 1, 2024, expires January 31, 2026).
- When the calculated anniversary-based expiry date is reached, the certification status changes to Expired.
| Anniversary Type | Description |
|---|---|
| Birth Date | Uses the learner’s date of birth as the anniversary date each year. |
| Hire Date | Uses the learner’s employment start date as the annual anniversary date. |
| Enrollment Date | Uses the date the learner was enrolled in the course, certification, or training. |
| Completion Date | Uses the date the learner completed the course or certification. |
- Update Considerations:
- Changes to birth or hire dates after setting expiry rules affect only future enrollments, not existing ones.
- If no hire or birth date exists, expiry does not apply.