

How to Create an Assessment
1. Navigate to the Create Assessment Page:
- Use Assessment → Create Assessment, Quick Access → Create, or the Create Assessment button on the Assessment Listing Page.
2. Complete Mandatory Fields:
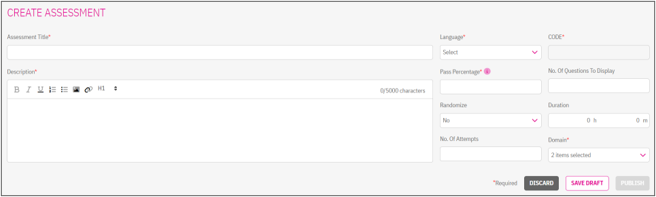
- Assessment Title (Mandatory): The name of the assessment (e.g., “Leadership Skills Evaluation”).
- Description (Optional): A text field for a brief description of the assessment’s purpose (e.g., “Evaluates leadership competencies”).
- Code (Mandatory):
- If Coding Convention is enabled at the site level, the code is auto-generated (e.g., “ASSM-001”) and non-editable.
- If the Coding Convention is disabled, the admin can enter a custom code.
- Language (Mandatory): A dropdown listing LMS-supported languages (e.g., English, Spanish).
- Default: English is auto-selected.
- Admins can change the language to suit the audience.
- Pass Percentage (Mandatory): The percentage score required to pass (e.g., “70”). Must be below 100.
3. Configure Optional Fields:
- Number of Questions to Display (Optional): The number of questions shown to learners (e.g., “10”). If unset, all questions are displayed.
- Randomize Questions (Optional): A dropdown to randomize content:
- Questions: Randomizes question order.
- Answers: Randomizes answer options.
- Both: Randomizes both questions and answers (default).
- No: No randomization.
- Duration (Optional): Set a time limit in minutes and seconds (e.g., “30:00”). No section-level timers are supported.
- No. of Attempts (Optional): Number of attempts allowed for standalone assessments (e.g., “3”).
- If unset, attempts are unlimited.
- Values “0” or three-digit numbers are invalid.
- Applies only to standalone assessments, not those attached to courses.
- The value entered in the “No. of attempts” field will be taken into consideration only for standalone assessments and not for the assessments attached to a course.
4. Add Questions:
- The user must enter the above information and select Save Draft to proceed to the edit section for adding the questions. (Refer to the Create Survey- Questions section to learn more).
- Create questions directly or import from the question library (see Action Icons section).
- Organize questions into sections if needed.
5. Choose an Action:
- Save as Draft: Saves the assessment in Draft mode, visible under the Drafts tab.
- Publish: Publishes the assessment for use, visible under the Published tab.
- Discard: Cancels changes and redirects to the Assessment Listing Page.
6. Upon saving or publishing, the admin is redirected to the Success Status Page with the message: “Assessment ‘[Title of the Assessment]’ has been published successfully” or “saved successfully” and a success icon.