

E-Learning classes in ExpertusONE LMS enable self-paced learning through digital resources such as videos, audio, presentations, documents, SCORM, AICC, and more. These classes allow learners to access training materials at their convenience, making them ideal for diverse organizational training needs, such as employee onboarding, compliance training, or skill development. This section provides a comprehensive walkthrough of creating E-Learning classes, covering navigation, course setup, content addition, and management, ensuring administrators can design effective self-paced learning experiences.
Navigation
To create an E-Learning class, administrators must first navigate to the course creation page. In the course creation page, choose the delivery type as E-Learning, and ensure that you fill in all the fields on the details page with the necessary information. For the E-Learning Course, Add Content is a mandatory section.
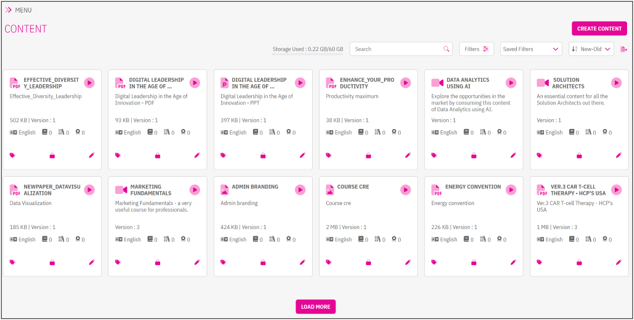
Adding Content to E-Learning Courses
Content is the core of E-Learning courses, providing learners with the digital resources needed for self-paced learning. The Add Content section is mandatory and must be completed before saving for an E-Learning course.
Accessing the Add Content Section
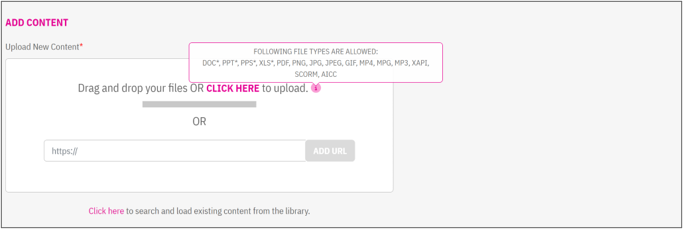
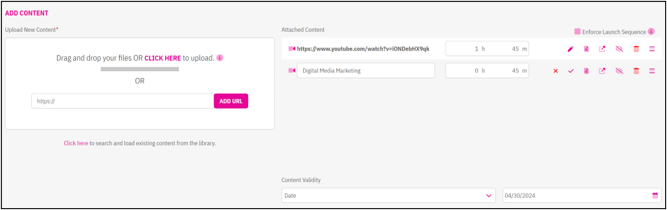
On the Create Course Page or Edit Course Page, scroll to the Add Content section, located under the Upload New Content box. This section is critical for E-Learning courses, as content delivery is the primary method of instruction.
Uploading Content
Administrators have three options to upload content:
1. Drag and Drop:
- Drag one file at a time from your local device into the designated upload box.
- This method is intuitive for uploading multiple files quickly.
2. Click Here (Browse):
- Click the Click Here link to open a file browser.
- Select a file from your device to upload. The user can select a single file at a time.
- Suitable for precise file selection.
3. Add URL:
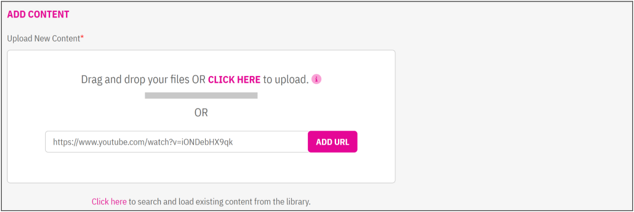
- Copy and paste a valid URL into the provided text box.
- Click the ADD URL button, which becomes enabled once a URL is entered.
- Ideal for linking to external resources like videos or web-based content.
Supported Content Types
The following formats are supported for E-Learning content. Click the Information (i) icon in the application to view the complete list of supported file formats and version requirements.
- Video: MP4, MPG
- Documents: PDF, PPT, DOC
- E-Learning Standards: XAPI, SCORM, AICC
If any file is in an unsupported format, the system will “Display an error message for unsupported formats, ensuring admins are aware of issues.”
When a doc, ppt, and excel are uploaded, the system displays a warning message. The uploaded content “Content_Name” can be downloaded by learners. If you do not want the file to be downloadable, please convert it to PDF before uploading. Do you want to continue with the upload?
Progress Display
The upload progress is displayed below the Attached Content section, providing real-time feedback on the status of file uploads.
Note: If the uploaded file is in an unsupported format, the system will display an error message and the file will not be uploaded.
Content Validity
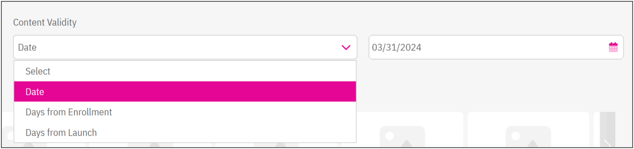
Content Validity determines how long course-related content remains available to learners. Define Content Validity using a dropdown to set an expiration date for all content attached to the course. Post-expiration, the content becomes unavailable to learners, ensuring outdated materials are not accessed.
Date
Specify a fixed expiration date for the content. Once the selected date is reached, learners can no longer access the content, regardless of their enrollment date.
Days from Enrollment
Define the number of days learners can access the content starting from their enrollment date. The expiration period is calculated individually for each learner.
Days from Launch
Define the number of days learners can access the content after they first launch the course or content item. The expiration period begins when the learner accesses the content for the first time.
Supported Content Types
The following formats are supported for E-Learning content. Click the Information (i) icon in the application to view the complete list of supported file formats and version requirements.
- Video: MP4, MPG
- Documents: PDF, PPT, DOC
- E-Learning Standards: XAPI, SCORM, AICC
If any file is in an unsupported format, the system will “Display an error message for unsupported formats, ensuring admins are aware of issues.”
When a doc, ppt, and excel are uploaded, the system displays a warning message. The uploaded content “Content_Name” can be downloaded by learners. If you do not want the file to be downloadable, please convert it to PDF before uploading. Do you want to continue with the upload?
Progress Display
The upload progress is displayed below the Attached Content section, providing real-time feedback on the status of file uploads.
Note: If the uploaded file is in an unsupported format, the system will display an error message and the file will not be uploaded.
Content Validity
Content Validity determines how long course-related content remains available to learners. Define Content Validity using a dropdown to set an expiration date for all content attached to the course. Post-expiration, the content becomes unavailable to learners, ensuring outdated materials are not accessed.
Date
Specify a fixed expiration date for the content. Once the selected date is reached, learners can no longer access the content, regardless of their enrollment date.
Days from Enrollment
Define the number of days learners can access the content starting from their enrollment date. The expiration period is calculated individually for each learner.
Days from Launch
Define the number of days learners can access the content after they first launch the course or content item. The expiration period begins when the learner accesses the content for the first time.
Managing Attached Content
Once content is uploaded, it appears in the Attached Content section on the right side of the page as line items. Each item includes details and action icons for management.
Details Displayed
- Content Name: The name of the uploaded file or URL.
- Duration: If the duration is found in the metadata file, that will be considered; otherwise, a static value that gets assigned to each file based on the type of the file.
Action Icons
The following action icons are available for each content item:
- Edit Icon:
- Click to modify the Content Name or Duration.
- A form appears to edit these fields.
- Save changes by clicking the Tick Mark or discard them with the X Mark.
- Preview Icon:
- Opens the content in a lightbox for preview, allowing admins to verify its appearance and functionality. Preview is disabled for PPT, document, and Excel.
- Open URL Icon:
- For URL-based content, open the URL in a new browser tab for preview.
- Download Icon:
- Download the uploaded content file to the admin’s device.
- Hide/Unhide Icon:
- Used to manage content versions without affecting learners who are already enrolled in the course.
- When new content is uploaded as a replacement, administrators can hide or unhide content to control which version is presented to learners.
- Learners who enrolled before the content change continue to access the content version available at the time of their enrollment.
- Learners who enroll after the content update are presented with the newer content version.
- This functionality allows administrators to update course content while preserving the learning experience for existing learners.
- It is primarily used as a content replacement/versioning mechanism for customers who do not have content versioning functionality.
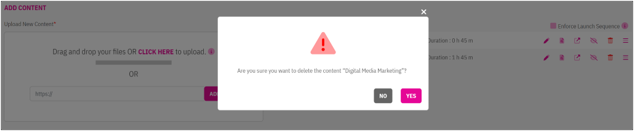
- Delete Icon:
- Removes a content item from the course.
- A confirmation message is displayed before the content is deleted.
- The impact of deleting content depends on whether learners have already enrolled in the training.
- When content is associated with active learner enrollments, the system applies the configured content management rules to preserve learner progress and content accessibility.
Content Access Behavior After Enrollment
- When a learner enrolls in a training, the learner receives access to the content that is associated with the training at the time of enrollment.
- If an administrator later deletes or hides a content item from the training, the change only affects future enrollments.
- Learners who enrolled before the content was deleted or hidden will continue to have access to that content.
- Learners who enroll after the content is deleted or hidden will not see or access the removed content.
Example
1. A training contains Content A.
2. Learner X enrolls in the training and gains access to Content A.
3. An administrator deletes Content A from the training.
4. Learner X continues to have access to Content A because it was available at the time of enrollment.
5. Learner Y enrolls after the deletion and will not have access to Content A.
Note: Content additions, deletions, and visibility changes are applied prospectively. Existing learners retain access to the content that was available when they enrolled, while new learners receive access based on the current content configuration of the training.
- Sequence Icon:
- A drag-and-drop icon to reorder content items.
- The order determines how content appears in the learner’s content player.
- If Enforce Launch Sequence is enabled, learners must follow this order.
Enforcing Launch Sequence
The Enforce Launch Sequence option ensures learners access content in a predefined order, enhancing structured learning.
How It Works
- When enabled, learners must complete each content item before accessing the next.
- Subsequent content remains locked until the current item is completed.
- This is useful for courses requiring sequential learning, such as compliance training or step-by-step tutorials.
How to Enable
- During course creation or editing, locate the Enforce Launch Sequence option.
- Check it to enable the feature.
- Use the Sequence Icon to arrange content in the desired order via drag-and-drop.
- Save the course to apply the setting.